Let AB be a line and K is an outside point. A line can have an infinite number of points on it, if we join these points to point K, we will get infinite line segments like KN, KR, KJ, KS, KT, KU, etc. Now the question is, which of these is the distance of AB from point K.
 Out of these line segments, the perpendicular from K to AB i.e. KJ will be the least. This least distance KJ is called the distance of AB from K. We may say that:
The length of the perpendicular from a point to a line is the distance of the line from the point.
If the point lies on the line, the distance of the line from the point is zero.
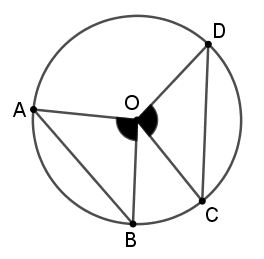
In a circle, we can draw infinite chords. By drawing chords of different lengths in a circle, we can observe that the longer chords are nearer to the center than the smaller chord (you may experiment this with the following applet). What is the distance of the diameter, which is the longest chord from the center? As we know that the center lies on the diameter, the distance is zero.
With the help of the applet below, we can explore the relationship between the lengths of the chord and their distance from the center. Points C and D can be used to alter the lengths of the chords CD, PQ, and LM. We can see that the chords which are equal in lengths are equidistant from the center of the circle.
The converse of the above statement is also true, which states that the chords equidistant from the center of a circle are equal in length.
 Out of these line segments, the perpendicular from K to AB i.e. KJ will be the least. This least distance KJ is called the distance of AB from K. We may say that:
The length of the perpendicular from a point to a line is the distance of the line from the point.
If the point lies on the line, the distance of the line from the point is zero.
In a circle, we can draw infinite chords. By drawing chords of different lengths in a circle, we can observe that the longer chords are nearer to the center than the smaller chord (you may experiment this with the following applet). What is the distance of the diameter, which is the longest chord from the center? As we know that the center lies on the diameter, the distance is zero.
With the help of the applet below, we can explore the relationship between the lengths of the chord and their distance from the center. Points C and D can be used to alter the lengths of the chords CD, PQ, and LM. We can see that the chords which are equal in lengths are equidistant from the center of the circle.
The converse of the above statement is also true, which states that the chords equidistant from the center of a circle are equal in length.