Friday, November 22, 2019

The distance of a Chord from the Center

Let AB be a line and K is an outside point. A line can have an infinite number of points on it, if we join these points to point K, we will get infinite line segments like KN, KR, KJ, KS, KT, KU, etc. Now the question is, which of these is the distance of AB from point K. 
Out of these line segments, the perpendicular from K to AB i.e. KJ will be the least. This least distance KJ is called the distance of AB from K. We may say that:
The length of the perpendicular from a point to a line is the distance of the line from the point.
If the point lies on the line, the distance of the line from the point is zero. 

In a circle, we can draw infinite chords. By drawing chords of different lengths in a circle, we can observe that the longer chords are nearer to the center than the smaller chord (you may experiment this with the following applet). What is the distance of the diameter, which is the longest chord from the center? As we know that the center lies on the diameter, the distance is zero.

With the help of the applet below, we can explore the relationship between the lengths of the chord and their distance from the center. Points C and D can be used to alter the lengths of the chords CD, PQ, and LM. We can see that the chords which are equal in lengths are equidistant from the center of the circle. 

The converse of the above statement is also true, which states that the chords equidistant from the center of a circle are equal in length.

Friday, November 15, 2019

Line (Segment) from the Center to a Chord

Line(Segment) from the Center to a Chord

Let us investigate a line (line segment) drawn from the center of the circle to a chord. BC is a chord of the circle with center at O. D is a point on the chord. What do you notice about the lengths BD and CD when the angle is 90℃.
Move the point D on the chord and look for a situation when the angle is 90℃ at this point what can you say about the lengths BD and CD, are they equal? You will observe that BD = CD. Here we can make the following conjecture:
  • The perpendicular from the center of a circle to a chord bisects the chord.
The converse of the above conjecture is also true:
  • If a line (line segment) is drawn from the center of a circle to the midpoint of a chord, then the line is perpendicular to the chord.
Let us prove the conjecture 1 above. This proof is based on the congruency of the triangles.
       Given: OD ⊥ BC
       Construction: Join OB and OC.
       Strategy: If we can show that △BDO 
       and △CDO are congruent then the 
       sides BD and CD must be equal.
       To prove: BD = CD
       Proof:
          In △ BDO and △ CDO
          OB = OC (Radii of the circle)
          OD = OD (Common Sides)
         ∠BDO = ∠CDO (given , both 90)
      Hence, △ BDO ≅ △ CDO
      Therefor, BD = CD (Corresponding Parts of Congruent Triangles)

Tuesday, November 12, 2019

Chord Length - Angle at Center Relationship

Angle Subtended by a Chord at the Center
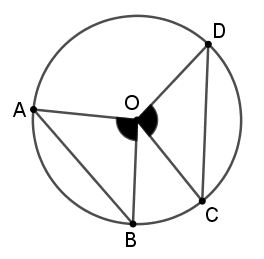
Take a chord RS of a circle with center O. Join the endpoints of the chord to the center of the circle. The ∠ ROS is called the angle subtended by the chord RS at the center. Let us examine the relationship between the length of the chord and the angle subtended by it at the center. Longer is the chord, the bigger will be the angle subtended by it at the center. What happens when we have two or more chords of equal lengths? Let us see :

We are given two-chords AB and CD of equal length. These chords belong to the same circle with center O.

In triangles AOB and COD
            OA = OC (Radii of the circle)
            OB = OD (Radii of the circle)
            AB = CD (Given)
       So △ AOB = △ COD (by SSS Rule)
Hence,  ∠ AOB = ∠ COD
We can say that equal chords of a circle subtend equal angles at the center.

The converse of the above statement is also true i.e. if the angles subtended by chords of a circle at the center are equal, then the chords are equal.

What about the arc lengths corresponding to the chords: With the help of tracing paper, we can see that arc length AB = arc length CD.

जीवा द्वारा केन्द्र पर अंतरित कोण
O केन्द्र बिन्दु के किसी वृत्त की एक जीवा RS लीजिए और जीवा के बिन्दुओं R व S को केन्द्र बिन्दु से जोड़िए। इस प्रकार बना कोण ∠ ROS , जीवा RS द्वारा केन्द्र पर अंतरित कोण कहलाता है। आइए हम जीवा की लंबाई की माप और उसके द्वारा केन्द्र पर अंतरित कोण के बीच के संबंध की जाँच करें। जीवा की लंबाई अधिक होगी ,तो उसके द्वारा केन्द्र पर अंतरित कोण भी बड़ा होगा। क्या होगा यदि हम दो बराबर लंबाई की जीवाएं लें ? आइए देखते हैं :

त्रिभुज AOB और COD में
            OA = OC (एक ही वृत्त की त्रिज्याएं )
            OB = OD (एक ही वृत्त की त्रिज्याएं)
            AB = CD (दिया है)
  अत:   △ AOB = △ COD (SSS नियम से)
  इस प्रकार,∠ AOB = ∠ COD
हम कह सकते हैं कि वृत्त की बराबर जीवाएं केन्द्र पर बराबर कोण अंतरित करती हैं।

उपर दिए कथन का विलोम भी सही है , यदि एक वृत्त की जीवाओं द्वारा केन्द्र पर अंतरित कोण बराबर हों , तो वे जीवाएं बराबर होती हैं।

यहां जीवाओं से जुड़े चाप की लंबाई के बारे में क्या कहा जा सकता है : एक ट्रेसिंग पेपर की मदद से हम यह देख सकते हैं कि AB चाप की लंबाई = CD चाप की लंबाई

Sunday, November 10, 2019

Circle Vocabulary (वृत्त शब्दावली)

Circle Vocabulary

Circle: The collection of all the points in a plane, which are at a fixed distance from a fixed point in the plane, is called a circle. The fixed point is called the center of the circle and the fixed distance is called the radius of the circle.
Chord: If you take two points A and B on the circle, then the line segment joining AB is called the chord of the circle.
Diameter: A chord that passes through the center of the circle is called the diameter of the circle. Diameter is the longest chord of the circle and it is twice the length of the radius of the circle.
Arc: A piece of the circle between two points is called an arc.
Circumference: The length of the complete circle is called its circumference.
Segment: The region between a chord and either of its arc is called a segment.
Sector: The region between an arc and the radii joining the endpoints of the arc to the center of the circle is called a sector.

All the above are shown in the applet below, you may move the points on the two circles and see the effects.

वृत्त शब्दावली

वृत्त : एक तल पर उन सभी बिन्दुओं का समूह , जो तल के एक स्थिर बिन्दु से एक स्थिर दूरी पर स्थित हों , एक वृत्त कहलाता है। स्थिर बिन्दु को वृत्त का केन्द्र कहते हैं तथा स्थित दूरी को वृत्त की त्रिज्या कहते हैं।
जीवा : यदि एक वृत्त पर दो बिन्दु A और B लें , तो रेखाखण्ड AB वृत्त की जीवा कहलाता है।
व्यास : वह जीवा जो वृत्त के केन्द्र से होकर जाती है , उसे वृत्त का व्यास कहते हैं। व्यास , वृत्त की सबसे बड़ी जीवा होती है। व्यास की लंबाई वृत्त की त्रिज्या से दो गुनी होती है।
चाप : दो बिन्दुओं के बीच के वृत्त के भाग को चाप कहते हैं।
परिधि : संपूर्ण वृत्त की लंबाई को उस वृत्त की परिधि कहते हैं।
वृत्तखण्ड : जीवा और प्रत्येक चाप के मध्य क्षेत्र को वृत्तखण्ड कहते हैं।
त्रिज्यखण्ड : केन्द्र को एक चाप के सिरों से मिलाने वाली त्रिज्याओं एवं चाप के बीच के क्षेत्र को त्रिज्यखण्ड कहते हैं।

नीचे दी गयी एपलेट में उपर परिभाषित सभी अवधारणाओं को दर्शाया गया है , दोनों वृत्त में दिखाए गए बिन्दुओं को हिला कर आप उनका प्रभाव देख सकते हैं।

Wednesday, November 6, 2019

संख्या-चार्ट और संबंधित गतिविधियां (Number Chart and related Activities)

संख्या-चार्ट गणित पढ़ाने का एक बहुमुखी उपकरण है। इसका उपयोग संख्या पैटर्न , संख्याओं के आपसी संबंध , संक्रियाएँ और समस्या समाधान से संबंधित गतिविधियां आदि पर कक्षा 1 से कक्षा 5 के बच्चों के साथ कार्य किया जा सकता है। संख्या-चार्ट की गतिविधियां बच्चों में संख्या-बोध के विकास में मदद करती हैं और इन गतिविधियों को कक्षा में व्यक्तिगत रूप से , छोटे – छोटे समूहों में या पूरी कक्षा के साथ कराया जा सकता है। साथ ही शिक्षक बच्चों को इनके अतिरिक्त अन्य गतिविधियाँ सोचने के लिए भी प्रेरित कर सकते हैं।
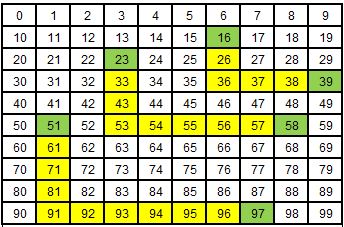
चित्र में 0 – 99 तक की संख्याओं का एक संख्या-चार्ट दिखाया गया है। इस चार्ट की मदद से नीचे दी गयी गतिविधियां करायी जा सकती हैं। 

1.विशेष संख्याएं : यह गतिविधि बच्चों को संख्या-चार्ट से परिचित कराने में मदद करती है। बच्चे संख्या-चार्ट पर कंकड़ की मदद से पाँच से दस संख्याओं को चिन्हांकित करते हैं और अपने साथी को कि ये संख्याएं उनके लिए विशेष क्यों हैं। 

        • उम्र                                   
        • जन्म तारीख 
        • परिवार में सदस्यों की संख्या 
        • मेरी प्रिय संख्या 
        • कक्षा में बच्चों की संख्या
        • विद्यालय में शिक्षकों की संख्या 
        • गाँव में घरों की संख्या 
        • गाँव की शहर से दूरी
2.चित्र बनाएं : यह गतिविधि संख्या-चार्ट के ज्ञान को पुष्ट कर बच्चों को पैटर्न को चित्र रूप में देखने में मदद करती है। जैसे , आप एक-एक कर नीचे दी गयी संख्याएं बोलते हैं और बच्चे उन संख्याओं पर कंकड़ रखते जाते हैं : 1,71,17,53,44,35,34,8,78,12,67,23,45,62,26,56
संख्या बोलना खत्म करने से पहले बच्चों से पूछें कि उन्हें कौन सा चित्र नजर आ रहा है। यदि बच्चे चित्र पहचान लें तो उन्हें आगे की संख्याएं बताने को कहें जिससे चित्र पूरा किया जा सके।

3. पड़ोसी संख्या ढूंढना : यह गतिविधि बच्चे के संख्या-चार्ट के ज्ञान को पुष्ट करने में सहायक होती है। बच्चे एक खाली संख्या-चार्ट का उपयोग करेंगे। एक बच्चा 0 – 99 के बीच कोई एक संख्या चुननेगा । अन्य बच्चे खाली-चार्ट में उस संख्या को सही जगह पर लिखेंगे। इसके पश्चात वे उस संख्या की सभी पड़ोसी संख्याएं लिखेंगे।संख्या-चार्ट पर पड़ोसी-संख्या वह संख्या है जो चुनी गयी संख्या से एक कम , एक अधिक , दस कम और दस अधिक होती है। अलग-अलग बच्चों को संख्या चुनने का मौका देते हुए संख्या-चार्ट के पूरा भरने तक इस गतिविधि को कराया जाए।

4. नाम का पैटर्न : यह गतिविधि बच्चों को विभिन्न प्रकार के संख्या-पैटर्न और संख्या- संबंधों से परिचय कराने के साथ-साथ गुणा की संक्रिया का एक आधार भी तैयार करती है। । इसके लिए बच्चे एक खाली संख्या-चार्ट का उपयोग करते हैं। बच्चे चार्ट में अपना नाम लिखेंगे , हर बॉक्स में एक अक्षर , जब तक की चार्ट पूरी तरह से न भर जाए। अब बच्चे अपने नाम के पहले अक्षर (चार्ट में जहाँ-जहाँ भी आये हैं) को शेड करेंगे , इस प्रकार उन्हें एक पैटर्न मिलेगा। बच्चे कक्षा में दूसरे बच्चों को ढूँढेंगे जिनका पैटर्न उसके पैटर्न के समान हो । समान पैटर्न के बच्चे एक साथ बैठकर अपने पैटर्न के बारे में चर्चा करेंगे । इस प्रकार के प्राप्त पैटर्न 2 , 3 , 4 , 5 , 6 , 7 आदि के गुणज होंगे जो बच्चों के नाम में अक्षरों की संख्या पर निर्भर करेगा।

5. संख्या पैटर्न : यह गतिविधि बच्चों को विभिन्न प्रकार के संख्या-पैटर्न और संख्या- संबंधों से परिचय कराने के साथ-साथ गुणा की संक्रिया का एक आधार भी तैयार करती है।
  • बच्चों से कहें कि वे उन सभी संख्याओं पर कंकड़ रखें जिनके इकाई या दहाई के स्थान पर 3 आता है। बच्चों को संख्या पैटर्न या संख्याओं के संबंधों पर विचार करने के लिए प्रेरित करें। उदाहरण के लिए ये संख्याएं एक क्षैतिज(आड़ी) और एक उर्ध्वाधर (खड़ी) रेखाएं बनाती हैं। ये रेखाएं 33 पर मिलती हैं और इस संख्या में इकाई और दहाई दोनों ही स्थान पर 3 है। उर्ध्वाधर रेखा पर संख्याएं उपर से नीचे 10 से बढ़ती हैं और क्षैतिज रेखा पर संख्याएं बाँए से दाँए 1 से बढ़ती है। बच्चों से पूछें कि क्या अन्य संख्याओं के लिए भी ये संबंध हैं। उन्हें उन सभी संख्याओं पर कंकड़ रखने को कहें जिनके इकाई या दहाई के स्थान पर 3 आता है और इस प्रकार बने पैटर्न और संख्या संबंधों पर चर्चा करने को कहें।
  • बच्चों को 11 , 22 , 33 , 44 , 55 , 66 , 77, 88 , 99 संख्याओं पर कंकड़ रखने को कहें और संख्याओं के पैटर्न और संबंधों पर चर्चा करें। एक पैटर्न जो बच्चे देख सकते हैं कि संख्याओं में अंको का योग (11 में 1+1=2 , 22 में 2+2=4 आदि) 2 , 4 , 6 , 8 , 10 , 12 , 14 , 16 , 18 है और ये सभी सम संख्याएं हैं। 
  • बच्चों को 1 , 12 , 23 , 34 , 45 , 56 , 67 , 78 , 89 संख्याओं पर कंकड़ रखने को कहें और संख्याओं के पैटर्न और संबंधों पर चर्चा करें। एक पैटर्न जो बच्चे देख सकते हैं कि संख्याओं में अंको का योग 1, 3 , 5 , 7 , 9 , 11, 13 , 15, 17 है और ये सभी विषम संख्याएं है। बच्चों को अगले विकर्ण की संख्याओं के साथ काम कर संख्या पैटर्न और संबंधों को देखने के लिए प्रेरित करें।
  • बच्चों को 5, 14 , 23 , 32 , 41 , 50 संख्याओं पर कंकड़ रखने को कहें और उन्हें पैटर्न और संख्या संबंधों का अवलोकन करने को कहें । बच्चे यह देख सकते हैं कि सभी संख्याओं के अंको का योग 5 है और 5 विकर्ण की पहली संख्या है। इसी प्रकार बच्चों को अन्य विकर्णों के पैटर्न का अवलोकन करने का समय दें।
6. आगे गिनना : यह गतिविधि बच्चों के जोड़ की संक्रिया की समझ का आधार बनाती है। बच्चे आपके निर्देश के अनुसार संख्याओं पर कंकड़ रखेंगे। 
                           25 और उसके आगे 3 गिने                  32 और उसके आगे 5 गिने
                           35 और उसके आगे 6 गिने                  36 और उसके आगे 7 गिने
                           73 और उसके आगे 2 गिने                  41 और उसके आगे 4 गिने

7. ‘से’ ज्यादा : यह गतिविधि बच्चों में ‘से ज्यादा या इससे अधिक ‘ की अवधारणा की पुष्टि और जोड़ की अवधारणा सीखने में मदद करती है। बच्चे आपके निर्देश के अनुसार संख्याओं पर कंकड़ रखेंगे।
                           15 से 4 अधिक                               40 से 9 अधिक
                           52 से 3 अधिक                               26 से 5 अधिक
                           61 से 6 अधिक                               43 से 7 अधिक
यहाँ शिक्षक “अधिक” शब्द के स्थान पर “ज्यादा” शब्द का उपयोग भी कर सकते हैं।

8. उल्टा गिनना : यह गतिविधि घटाव संक्रिया की समझ का आधार रखती है। बच्चे आपके निर्देश के अनुसार संख्याओं पर कंकड़ रखेंगे।
                          38 से पीछे 4 गिने                             58 के पीछे 2 गिने
                          23 के पीछे 6 गिने                             73 के पीछे 3 गिने
                          47 के पीछे 1 गिने                             69 के पीछे 8 गिने
यहाँ शिक्षक “पीछे” शब्द के स्थान पर “पहले” शब्द का उपयोग भी कर सकते हैं।

9. ‘से’ कम : यह गतिविधि बच्चों में ‘से कम या इससे कम ‘ की अवधारणा की पुष्टि और घटाने की अवधारणा सीखने में मदद करती है। बच्चे आपके निर्देश के अनुसार संख्याओं पर कंकड़ रखेंगे।
                        49 से 3 कम                                      89 से 8 कम
                        21 से 4 कम                                      30 से 7 कम
                        56 से 6 कम                                      16 से 3 कम

10. दस अधिक या कम : यह गतिविधि बच्चों में 10 की गिनती की पुष्टि करता है। यह बच्चों में स्थानीय मान की समझ के लिए आधार का काम करता है।
                      2 से 10 ज्यादा (अधिक)                           48 से 10 कम
                     24 से 10 ज्यादा                                     62 से 10 कम
                     63 से 10 ज्यादा                                     76 से 10 कम

11. बिंगो : यह गतिविधि बच्चों को इकाई और दहाई के साथ स्थानीय मान समझने में मदद करती है। इस गतिविधि के लिए हर बच्चा खाली संख्या-चार्ट का उपयोग करेगा। शिक्षक 0 – 99 के काउंटर्स एक छोटे बक्से में रखेंगे। एक बच्चा बक्से से एक काउंटर निकालेगा और संख्या को इकाई व दहाई के रूप में कहेगा , उदाहरण के लिए 25 को वह दो दहाई और पाँच इकाई कहेगा। कक्षा के अन्य बच्चे संख्या सुनकर संख्या-चार्ट में उस स्थान पर एक कंकड़ रखेंगे। अलग-अलग बच्चे बक्से से काउंटर निकालकर संख्या कहेंगे और बच्चे अपने संख्या-चार्ट पर कंकड़ रखते जाएंगे। यह कार्य तब तक चलता रहेगा जब तक कि बच्चों की कोई पंक्ति या कॉलम पूरा नहीं हो जाता।

12. संख्या चार्ट पर जोड़ना और घटाना : यह गतिविधि बच्चों को संख्या चार्ट पर जोड़ने और घटाने के अभ्यास का मौका देती है। संख्या चार्ट पर संख्याओं को किस प्रकार से जोड़ा जाता है , बच्चों के सामने इसका प्रदर्शन करें। उदाहरण के लिए 33 + 48 । बच्चे 33 पर एक कंकड़ रखेंगे। उनसे पूछें कि 48 में कितने दहाई (4) हैं। उन्हें याद दिलाएं कि एक बॉक्स नीचे आने पर संख्या 10 बढ़ती है। हमें 33 से 4 बॉक्स नीचे आना है (43 , 53 , 63 , 73) । बच्चों से पूछें कि 48 में 8 क्या दिखाता है (इकाई)। बच्चों को याद दिलाएं कि क्षैतिज दिशा में बाँयीं ओर जाने से संख्या एक से बढ़ती है। हमें 73 से बाँयीं ओर 8 स्थान आगे बढ़ना है (74 , 75 , 76 , 77 , 78 , 79 , 80 , 81) । इस प्रकार हम 81 पर पहुँचे , अत: 33 + 48 = 81। इसी प्रकार और उदाहरणों से जोड़ का अभ्यास कराएं।
अब संख्या चार्ट की मदद से घटाने का प्रदर्शन करें। उदाहरण के लिए 72 – 44 । बच्चे 72 पर एक कंकड़ रखेंगे। बच्चों से पूछें , 44 में कितने दहाई हैं (4) । 72 से चार बॉक्स उपर चढ़ेंगे (62 , 52 , 42 , 32) । अब बच्चों से पूछें कि 44 में दांयी ओर का 4 क्या दर्शाता है (इकाई) । अब हम 32 से क्षैतिज दिशा में बाँयीं ओर 4 स्थान पीछे जाएंगे (31 , 30 , 29 , 28) । इस प्रकार हम 28 पर पहुँचे , अत: 72 – 44 = 28। इसी प्रकार और उदाहरणों से घटाने का अभ्यास कराएं।

13. छोड़कर गिनना या गुणज पहचानना : यह गतिविधि बच्चों में छोड़ कर गिनना , गुणज और गुण की अवधारणा की समझ विकसित करने में मदद करती है।
  • बच्चे दो – दो छोड़ कर गिनते हुए (0 , 2 , 4 , 6 , 8 , 10,......98) संख्याओं पर कंकड़ रखेंगे। बच्चों को इस प्रकार बने पैटर्न को पहचानने को कहें। इस प्रकार कंकड़ पाँच उर्ध्वाधर (खड़ी) रेखाएं बनाएंगे। सभी संख्याएं सम संख्याएं और 2 की गुणज होंगी। इस संख्याओं में इकाई अंक 0 या 2 या 4 या 6 या 8 होंगे। 
  • बच्चों को तीन – तीन छोड़ कर संख्याओं पर कंकड़ रखने को कहें। इस प्रकार का बना पैटर्न विकर्ण रेखाओं को दिखाता है और इन विकर्णों की संख्याओं पर अंकों का योग 3 , 6 , 9 , 12 , 15 , 18 होगा। 
  • इसी प्रकार बच्चों को 4 , 5 , 6 , 7 , 8 , 9 , 10 तक संख्याओं को छोड़ कर कंकड़ रखने और बने पैटर्न का अध्ययन करने को कहें।
14.सम-अपवर्त्य पहचानना : यह गतिविधि बच्चों में ‘छोड़ कर गिनने’ और गुणज की अवधारणा की पुष्टि करती है। यह गतिविधि तीन या चार बच्चों के समूह में करायी जा सकती है। समूह में बच्चे संख्या-चार्ट पर 3 के गुणज पर कंकड़ रखेंगे। फिर बच्चे 4 के गुणज पर कंकड़ रखेंगे।अब बच्चे उन संख्याओं को लिखेंगे जिन पर दो कंकड़ (12 , 24 , 36 , 48 , 60 , 72 , 84 , 96) रखे हैं। इन संख्याओं को सम-अपवर्त्य (common multiple) कहते हैं। इन सम-अपवर्त्य में सबसे छोटे अपवर्त्य की पहचान करें (12) और 100 तक के 3 और 4 के सम-अपवर्त्य में सबसे बड़े अपवर्त्य (96) की पहचान करें। इसी प्रकार बच्चों से अन्य संख्याओं के गुणज , सम-अपवर्त्य , सबसे छोटे और 100 तक सबसे बड़े अपवर्त्य की पहचान का अभ्यास कराएं।

15. अभाज्य संख्याएं : यह गतिविधि बच्चों में अभाज्य संख्याओं की समझ विकसित करने में मदद करेगी और वे 0 – 99 के बीच की अभाज्य संख्याओं को जान पाएंगे। आपके दिए निर्देशों के अनुसार बच्चे संख्याओं पर कंकड़ रखते जाएंगे। 4 से शुरू करते हुए 2 के सभी गुणज पर कंकड़ रखने को कहें। इसी प्रकार 6 से शुरू करते हुए 3 के सभी गुणज पर कंकड़ रखने को कहें। फिर बच्चे 4 के सभी गुणज पर कंकड़ रखेंगे। अब बच्चे 5 को छोड़कर 5 के सभी गुणज पर कंकड़ रखेंगे और इसके बाद वे 6 के सभी गुणज पर कंकड़ रखेंगे। अंत में 7 को छोड़कर 7 के सभी गुणज पर कंकड़ रखेंगे। इस बात का ध्यान रखा जाए कि यदि किसी संख्या पर कंकड़ रखा हो तो उस पर दोबारा कंकड़ रखने की आवश्यकता नहीं है।
अब बिना कंकड़ रखी संख्याओं की पहचान करें (2 , 3 , 5 , 7 , 11 , 13 , 17 , 19 , 23 , 29 , 31 , 37 , 41 , 43 , 47 , 53 , 59 , 61 , 67 , 71 , 73 , 79 , 83 , 89 , 97) , ये सभी अभाज्य संख्याएं (Prime Numbers) हैं। बच्चों को बताएं कि अभाज्य संख्याओं के केवल दो ही गुणनखण्ड , 1 और स्वयं वह संख्या , होते हैं। अभाज्य संख्याएं स्वयं और एक से ही अभाज्य संख्याएं केवल स्वयं या एक से ही विभाजित होती हैं।

इस प्रकार एक संख्या-चार्ट की मदद से संख्याओं से संबंधित अलग-अलग अवधारणाओं समझ विकसित की जा सकती है। उपरोक्त गतिविधियों के अतिरिक्त कई अन्य गतिविधियां भी संख्या-चार्ट की मदद से करायी जा सकती हैं। संख्या-चार्ट बहुत ही आसानी से A4 पेपर पर बनाया जा सकता है या कंप्यूटर में किसी स्प्रेडशीट अथवा वर्डप्रोसेसर साफ्टवेयर की मदद से भी इसे तैयार कर उपयोग में लाया जा सकता है।

Tuesday, October 8, 2019

Construction of a triangle whose perimeter and base angles are given

एक त्रिभुज की रचना करना जिसका परिमाप और आधार के कोण दिए हैं।
हमें एक ऐसे त्रिभुज की ABC कि रचना करनी है जिसका परिमाप (तीनों भुजाओं की लंबाई का योग) और त्रिभुज के आधार के दोनों कोणों की माप दी गयी है। माना कि त्रिभुज ABC का परिमाप(AB + Bc + CA) 10 सेमी है और आधार के दो कोण क्रमश: 45° और 60° के हैं। इस त्रिभुज की रचना के निम्न चरण हैं :

चरण 1 – त्रिभुज के परिमाप 10 सेमी के बराबर एक रेखाखण्ड PQ खींचिए।

चरण 2 – बिन्दु P पर दिए गए आधार का एक कोण (45° का) बनाईये।

चरण 3 – बिन्दु Q पर दिए गए आधार का दूसरा कोण (60° का) बनाईये।

चरण 4 – चरण 2 और चरण 3 में बने कोणों के अर्धक बनाईये।

चरण 5 – दोनों कोण अर्धकों के प्रतिच्छेद बिन्दु A को अंकित करें।

चरण 6 – AP और AQ के लंब-समद्विभाजक बनाईये।

चरण 7 – AP के लंब-समद्विभाजक और PQ के प्रतिच्छेद बिन्दु B तथा AQ के लंब-समद्विभाजक और PQ के प्रतिच्छेद बिन्दु C को अंकित करें।

चरण 8 – A से बिन्दु B और बिन्दु C को मिलाइये। इस प्रकार बना त्रिभुज ABC वान्छित त्रिभुज है।

STEP स्लाईडर के उपयोग से त्रिभुज की रचना के विभिन्न चरण देखे जा सकते हैं।

Construction of a triangle whose perimeter and base angles are given.
We need to construct a triangle ABC whose perimeter (sum of lengths f two sides) and measure of two base angles are given. Let the perimeter (AB+BC+CA) of the triangle ABC be 10 cm and the measure of two base angles are 45° and 60°. The construction can be completed in the following steps:

Step 1 – Draw a line segment of 10 cm length equal to the perimeter of the triangle.

Step 2 – Make an angle of 45° at point P.(one of the given angles)

Step 3 – Make an angle of 60° at point Q.(second given angle)

Step 4 – Construct the angle bisectors of angles of step 2 and step 3.

Step 5 – Mark the point of intersection of two angle bisectors.

Step 6 – Construct the perpendicular bisectors of AP and AQ.

Step 7 – Mark point B, the point of intersection of the perpendicular bisector of AP and PQ. Similarly mark point C, the point of intersection of the perpendicular bisector of AQ and PQ.

Step 8 – Join A to point B and point C. The triangle ABC thus formed is the required triangle.

Slider STEP can be used to see the different steps of construction of the triangle.

Monday, October 7, 2019

Locate the Center of a given Circle

किसी दिए गए वृत्त के केन्द्र का पता लगाना
हमें एक वृत्त दिया गया है जिसके केन्द्र बिन्दु की जानकारी नहीं दी गयी है। हमें इस वृत्त के केन्द्र बिन्दु की स्थिति ज्ञात करनी है। यह कार्य निम्न चरणों में किया जा सकता है :

चरण 1 – किसी चूड़ी या कटोरी की मदद से एक वृत्त बनाएं। यह वृत्त हमें दिया गया है।

चरण 2 – दिए गए वृत्त की कोई दो असमान्तर जीवाएं PQ और LM खींचिए।

चरण 3 – PQ का लंबार्धक खींचें।

चरण 4 – LM का लंबार्धक खींचें।

चरण 5 – चरण 3 व चरण 4 के लंबार्धकों के प्रतिच्छेद बिन्दु O को अंकित करें।

चरण 6 – बिन्दु O दिए गए वृत्त का केन्द्र है।

नीचे एपलेट में बिन्दु P की मदद से वृत्त को छोटा – बड़ा किया जा सकता है।

To locate the center of a given circle
We are given a circle location of whose center is not known. We need to locate the center of this circle. This can be done in the following steps:

Step 1 – Draw a circle with the help of a bangle or a bowl.

Step 2 – Draw any two non – parallel chords PQ and LM of the given circle.

Step 3 – Construct the perpendicular bisector of the chord PQ.

Step 4 - Construct the perpendicular bisector of the chord LM.

Step 5 – Mark the point of intersection O of the two bisectors of step 3.

Step 6 – O is the center of the given circle.

In the applet below, use point P to change the size of the circle.

Sunday, October 6, 2019

Construction of Tangents to a Circle

वृत्त की स्पर्श रेखाओं की रचना
किसी वृत्त की स्पर्श रेखा , वह रेखा है जो उस वृत्त को केवल एक ही बिन्दु पर प्रतिच्छेद करती है। वृत्त के किसी बिन्दु से केवल एक ही स्पर्श रेखा खींची जा सकती है। स्पर्श रेखा और वृत्त के उभयनिष्ठ बिन्दु को स्पर्श बिन्दु कहा जाता है। इस बिन्दु पर वृत्त की त्रिज्या , स्पर्श रेखा के लंबवत होती है।

यदि कोई बिन्दु वृत्त के अंदर स्थित हो तो उस बिन्दु से वृत्त की कोई भी स्पर्श रेखा नहीं खींची जा सकती है। वृत्त पर स्थित किसी बिन्दु से उस वृत्त पर एक और केवल एक ही स्पर्श रेखा खींची जा सकती है। यदि बिन्दु वृत्त के बाहर हो तो उस बिन्दु से वृत्त पर दो स्पर्श रेखाएं खींची जा सकती हैं । इन स्पर्श रेखाओं की लंबाई बराबर होती हैं। नीचे चित्र में PQ=PR।

मान लीजिए हमें एक वृत्त दिया गया है जिसका केंद्र बिन्दु O है और एक बाह्य बिन्दु P दिया गया है। हमें इस बाह्य बिन्दु से वृत्त पर स्पर्श रेखाएं खींचनी हैं।बाह्य बिन्दु से दिए गए वृत्त पर स्पर्श रेखाएं खींचने के चरण इस प्रकार हैं :

चरण 1 – दिया गया वृत्त बनाईये और बाह्य बिन्दु P अंकित कीजिए।

चरण 2 – बिन्दु P से वृत्त के केन्द्र O को जोड़िए।

चरण 3 – OP को दो बराबर हिस्सों में बांटिए , माना कि OP का मध्य बिन्दु N है।

चरण 4 – N को केन्द्र मानकर और ON (NP) त्रिज्या लेकर एक वृत्त खींचिए।

चरण 5 – चरण 3 के वृत्त और दिए गए वृत्त के प्रतिच्छेद बिन्दु Q और R अंकित करें।

चरण 6 – PQ और PR को जोड़िए। यहां PQ और PR वान्छित स्पर्श रेखाएं हैं।

यदि हम OR और OQ जोड़ें तो पाएंगे कि △OPQ और △OPR सर्वांगसम त्रिभुज हैं। अत: ∠OPQ = ∠OPR
इस प्रकार हम पाते हैं कि बाह्य बिन्दु को दिए गए वृत्त के केन्द्र से जोड़ने वाली रेखाखण्ड दोनों स्पर्श रेखाओं के बीच के कोण को बराबर भागों में बांटती है।

यदि हमें वृत्त का केन्द्र न दिया हो तो हम दिए गए वृत्त की कोई दो असमांतर जिवाएं लेकर उनके लंबार्धकों के प्रतिच्छेद बिन्दु निकालें , यही वृत्त का केन्द्र होगा , अब उपर दिए गए चरणों को पूरा कर सकते हैं।

बिन्दु B की मदद से दिए गए वृत्त की त्रिज्या कम ज्यादा की जा सकती है और STEP स्लाईडर की मदद से रचना के चरणों को देखा जा सकता है।

Construction of tangents to a Circle
Tangent to a circle is a line that intersects the circle at only one point. Only one tangent can be drawn from a point on the circle. The common point of the tangent and the circle is called the point of contact. The radius of the circle at this point is perpendicular to the tangent.

If a point lies inside the circle then no tangent can be drawn from that point to the circle. From a point lying on the circle, we can draw one and only one tangent to the circle. If the point lies outside the circle, then we can draw two tangents to the circle. The lengths of these two tangents are equal. From figure PQ = PR.

Let us assume that we are given a circle with center O and a point P outside the circle. We need to construct tangents from point P to the circle. The steps of construction are as follows :

Step 1 – Draw the given circle and mark external point P.

Step 2- Join, point P to the center of the circle O with a line segment.

Step 3 – Bisect OP, let the midpoint of OP be N.

Step 4 – With N as center and radius NO(NP), draw a circle.

Step 5 – Let this circle intersect the given circle at points Q and R.

Step 6 – Join PQ and PR. PQ and PR are the desired tangents to the given circle.

If we join OR and OR, then we see that △ OPQ and △ OPR are congruent. From this, we get ∠OPQ = ∠OPR

Hence, the line segment joining the external point to the center of the circle bisects the angle between the tangents drawn from the external point to the circle. 

If the center of the circle is not given then we may locate the center by first taking the two non-parallel chords of the circle and then finding the point of intersection of their perpendicular bisectors. Then we follow the steps described above. 

Use point B to change the radius of the given circle. The steps of construction can be seen with the help of slider STEP.


Saturday, October 5, 2019

Pythagoras Theorem-Proof I

पाइथागोरस प्रमेय 
किसी समकोण त्रिभुज में कर्ण की लंबाई का वर्ग अन्य दो भुआओं के वर्ग के योग के बराबर होता है। यदि त्रिभुज ABC में कोण B समकोण हो तो AB2 + BC2 = AC2 । इस प्रमेय को सिद्ध करने के लिए हम समरूप त्रिभुज की अवधारणाओं की मदद ले सकते हैं।
त्रिभुज ABC में बिन्दु B से यदि AC पर लंब BD डाला जाए तो
               
            अवलोकन 1 : △ABC ~ △ADB , अत: AB/AC = AD/AB, AB2=AC.AD ... (1)
            अवलोकन 2 : △ABC ~ △BDC , अत: AC/BC = BC/DC, BC2=AC.DC … (2)

समीकरण (1) और (2) से AB2 + BC2 = AC.AD + AC.DC
                              AB2 + BC2 = AC.(AD+DC) = AC.AC = AC2

नीचे दिए एपलेट में बिन्दुओं A , B , C की स्थिति को माउस की मदद से बदला जा सकता है और AB , BC तथा AC के अलग-अलग मानों के लिए पाइथागोरस प्रमेय की जाँच की जा सकती है। 

Pythagoras Theorem
In a right triangle, the square of the length of the hypotenuse is equal to the sum of the squares of the lengths of the legs (other two sides). IF in △ ABC, angle B is right angle then AB2 + BC2 = AC2. For proving this theorem, we will use the concept of similar triangles.

In △ ABC, if we draw a perpendicular BD from point B to side AC then,
    Observation 1: △ ABC ~ △ ADB, so AB/AC = AD/AB, AB2=AC.AD ….. (1)
    Observation 2: △ ABC ~ △ BDC, so AC/BC = BC/DC, BC2=AC.DC …...(2)
From equation (1) and (2), AB2 + BC2 = AC.AD + AC.DC
                                       AB2 + BC2 = AC.(AD+DC) = AC.AC = AC2

In the applet shown below, points A, B, C can be moved with the help of a mouse to see the verification of the Pythagoras Theorem for different values of AB, BC, and AC.

Thursday, October 3, 2019

Construction of Triangle - RHS Case

एक समकोण त्रिभुज की रचना करना जिसके कर्ण और एक भुजा की लंबाई दी गयी है। 
हमें एक समकोण त्रिभुज की रचना करनी है जिसके कर्ण की लंबाई और एक भुजा की लंबाई दी गयी है। मान लीजिए हमें त्रिभुज ABC की रचना करनी है जहां ∠ABC=90° , BC = 4 सेमी और, AC=5 सेमी । इस त्रिभुज की रचना के चरण नीचे दिए जा रहे हैं :

चरण 1 – दिए गए मापों से एक रफ आकृति बनाएं। ∠ABC को समकोण अंकित कीजिए।

चरण 2 – 4 सेमी लंबाई का एक रेखा खंड BC खींचिए।

चरण 3 – बिन्दु B पर BC से 90° का कोण बनाते हुए एक किरण BX खींचिए। त्रिभुज के दिए गए मापों के अनुसार बिन्दु A इसी किरण पर स्थित है , हमें उसकी सही स्थिति ज्ञात करनी है।

चर॑ण 4 – बिन्दु C को केन्द्र मानकर 5 सेमी त्रिज्या का एक चाप बनाईए , बिन्दु A इस चाप पर स्थित होना चाहिए।

चरण 5 – चरण 3 और चरण 4 से स्पष्ट है कि बिन्दु A किरण BX और चरण 4 के चाप का प्रतिच्छेद बिन्दु है। बिन्दु A अंकित कीजिए।

चरण 6 – AC को जोड़कर त्रिभुज ABC पूरा करें।

स्लाईडर BC और AC का उपयोग कर त्रिभुज की रचना इनके अलग-अलग मानों के लिए देखी जा सकती है। साथ ही इनका उपयोग इन भुजाओं के उन मानों की खोज में भी की जा सकती है जिनके लिए त्रिभुज की रचना संभव नहीं है।

Construction of a right triangle length of whose hypotenuse and one side is given.
We need to construct a right triangle in which the length of the hypotenuse and one of its sides are given. Let us construct a triangle ABC in which ∠ABC=90°, BC=4 cm, and AC=5 cm. The steps of construction are given below:
Step 1 – Draw a rough sketch with the given information. Mark the right angle.

Step 2 – Draw a line segment BC of 4 cm length.

Step 3 – At point B, draw a ray BX at an angle of 90° to BC. As per the given information, the point A is located somewhere on this ray. We need to find its exact location.

Step 4 – With point C as a center and radius equal to 5 cm, draw an arc. Point A is located on this ray also.

Step 5 – From step 3 and step 4 it is clear that point A is the intersection of rays BX and arc of step 4. Mark point A.

Step 6 – Join AC and complete the triangle ABC.

The sliders BC and AC can be used to alter the length of sides and see the construction for their different values. These can also be used to explore the lengths for which the construction of the triangle is not possible.

Tuesday, October 1, 2019

Construction of a Triangle - ASA Case

एक त्रिभुज की रचना जिसके दो कोणों के माप और उनके बीच की भुजा की लंबाई दी हो।
हमें एक ऐसे त्रिभुज की रचना करनी है जिसके दो कोणों के माप और उन कोणों के बीच की भुजा की लंबाई दी गयी है। मान लीजिए हमें त्रिभुज ABC की रचना करनी है जहां BC = 4 सेमी , ∠ABC=45° और ∠ACB=105° दिया गया है। इस त्रिभुज की रचना के चरण नीचे दिए जा रहे हैं :

चरण 1 – दिए गए मापों से एक रफ आकृति बनाएं।

चरण 2 – 4 सेमी लंबाई का एक रेखा खंड BC खींचिए।

चरण 3 – बिन्दु B पर BC से 45° का कोण बनाते हुए एक किरण BX खींचिए। त्रिभुज के दिए गए मापों के अनुसार बिन्दु A इसी किरण पर स्थित है , हमें उसकी सही स्थिति ज्ञात करनी है।

चर॑ण 4 – बिन्दु C पर CB से 105° का कोण बनाते हुए एक किरण CY खींचिए। त्रिभुज के दिए गए मापों के अनुसार बिन्दु A इसी किरण पर भी स्थित है।

चरण 5 – चरण 3 और चरण 4 से स्पष्ट है कि बिन्दु A किरण BX और किरण CY का प्रतिच्छेद बिन्दु है। बिन्दु A अंकित कीजिए। इस प्रकार बना त्रिभुज ABC वान्छित त्रिभुज है।

नीचे दिखायी गयी एपलेट में त्रिभुज के दो कोणों और उनके बीच की भुजा के मानों के लिए तीन स्लाईडर बनाए गए हैं। माउस की मदद से इनके अलग-अलग मानों के लिए त्रिभुज की रचना देखी जा सकती है।
Construction of a triangle in which measure of two angles and the length of side between them are given.
We need to construct a triangle in which the measure of two angles and the length of the side between the given angles are given. Let us construct a triangle ABC in which BC=4 cm, ABC=45°, and ∠ACB=105°. The steps of construction are given below:

Step 1 – Draw a rough sketch with the given length and measure of angles.

Step 2 – Draw a line segment BC of 4 cm length.

Step 3 – At point B, draw a ray BX at an angle of 45° to BC. As per the given information, the point A is located on this ray only. We need to find its exact location.

Step 4 – At point C, draw another ray CY at an angle of 105° to CB. As per the given information, point A is located on this ray too.

Step 5 – From step 3 and step 4 it is clear that point A is the intersection of rays BX and CY. Mark point A. The triangle ABC so obtained is the required triangle.

In the applet shown below the values of two angles and the length of side between them are shown by three sliders. These sliders may be operated with the help of a mouse to see the construction of the triangle for different values.

Monday, September 30, 2019

Construction of Triangle - SAS Case

एक त्रिभुज की रचना जिसकी दो भुजाओं की लंबाई और उनके बीच का कोण दिया गया है।
हमें एक ऐसे त्रिभुज की रचना करनी है जिसकी दो भुजाओं की लंबाई और उन भुजओं के बीच का कोण दिया गया है। इस रचना के लिए हमें केवल रूलर और परकार का उपयोग करना है। हमें एक △ LMN की रचना करनी है जहां LM=3 सेमी, MN=5 सेमी और ∠LMN=60° दिया है। इस त्रिभुज की रचना नीचे दिए चरणों में की जा सकती है :

चरण 1 – दिए गए मापों से एक रफ आकृति बनाएं।

चरण 2 – 5 सेमी लंबाई का एक रेखा खंड MN खींचिए।

चरण 3 – बिन्दु M पर MN से 60° का कोण बनाते हुए एक किरण MX खींचिए। बिन्दु L इसी किरण पर स्थित है , हमें उसकी सही स्थिति ज्ञात करनी है।

चर॑ण 4 – बिन्दु M से बिन्दु L की दूरी 4 सेमी दी गयी है । अत: बिन्दु M को केन्द्र मानकर , 4 सेमी त्रिज्या लेकर किरण MX को प्रतिच्छेद करता हुआ एक चाप खींचिए।

चरण 5 – चरण 4 के चाप और किरण MX के प्रतिच्छेद बिन्दु L को अंकित कीजिए।

चरण 6 – LN को जोड़िए , इस प्रकार बना △ LMN वान्छित त्रिभुज है।

नीचे दिखायी गयी एपलेट में भुजाओं की दी गयी लंबाई और कोण के अनुसार छ: चरणों में त्रिभुज की रचना दिखाई गई है। छठवें चरण में तीन नए स्लाईडर दिखाई देते हैं जो भुजाओं की लंबाई को 1 इकाई से 8 इकाई तब व उनके बीच के कोण के मान को बदल सकते हैं। इनके अलग-अलग मान के अनुसार त्रिभुज की रचना देखी जा सकती है। 

Construction of a triangle whose length of two sides and angle between them is given
We need to construct a triangle whose length of two sides and the angle between them is given. We will be using ruler and compass for this construction. We are asked to construct △ LMN with LM=3 cm, MN=5 cm, and ∠LMN=60°.The construction can be done in the following steps :

Step 1 – Draw a rough sketch with the given lengths and angle.

Step 2 – Draw a line segment MN of 5 cm length.

Step 3 – At point M draw a ray MX at an angle of 60° to MN. The point L is located on this ray only. We need to find its exact location.

Step 4 - The distance of point L from point M is 4 cm. Taking M as a center and radius equal to 4 cm draw an arc to cut the ray MX.

Step 5 - Mark the point of intersection L of the arc of step 4 and ray MX.

Step 6 – Join LN, The △ LMN so obtained is the required triangle.

In the applet shown below, the construction of the triangle of given sides length and the angle between them is shown in six steps. In the sixth step, three sliders representing side lengths from 1 unit to 8 units and angle between them are shown at the bottom. These can be used to see the construction of triangles with their different values.

Sunday, September 29, 2019

Construction of a triangle whose side lengths are given(SSS Case)

एक त्रिभुज की रचना जिसकी तीनों भुजाओं की लंबाई दी गयी है।
हमें एक ऐसे त्रिभुज की रचना करनी है जिसकी तीनों भुजाओं की लंबाई दी गयी है। इस रचना के लिए हमें केवल रूलर और परकार का उपयोग करना है। एक त्रिभुज की रचना तभी संभव है जब उसकी किन्हीं भी दो भुजाओं की लंबाइयों का योग तीसरी भुजा की लंबाई से अधिक होता है। हमें एक △PQR की रचना करनी है जहां PQ=4 सेमी,QR=5 सेमी और PR=6 सेमी दिया है। हम देखते हैं कि दी गयी लंबाइयां उक्त शर्त को पूर्ण करती हैं। इस त्रिभुज की रचना नीचे दिए चरणों में की जा सकती है:

चरण 1 – भुजाओं की दी गयी मापों से एक रफ आकृति बनाएं ।

चरण 2 – 5 सेमी लंबाई का एक रेखा खंड QR खींचिए।

चरण 3 – बिन्दु Q से बिन्दु P की दूरी 4 सेमी दी गयी है । अत: बिन्दु Q को केन्द्र मानकर , 4 सेमी त्रिज्या लेकर एक चाप रेखाखंड QR के एक ओर बनाएं। बिन्दु P इसी चाप पर स्थित है , हमें उसकी सही स्थिति ज्ञात करनी है।

चर॑ण 4 - बिन्दु R से बिन्दु P की दूरी 6 सेमी दी गयी है । अत: बिन्दु R को केन्द्र मानकर , 6 सेमी त्रिज्या लेकर एक चाप उसी ओर बनाएं जिस ओर चरण 3 में बनाए थे। बिन्दु P इस चाप पर स्थित है।

चरण 5 – चरण 3 और चरण 4 से स्पष्ट है कि बिन्दु P इन चरणों में बनाए गए चापों का प्रतिच्छेद बिन्दु है। बिन्दु P को अंकित कर PQ और PR को जोडिए। इस प्रकार बना △PQR ही वान्छित त्रिभुज है।

नीचे दिखायी गयी एपलेट में त्रिभुज की भुजाओं की दी गयी लंबाई के अनुसार पांच चरणों में त्रिभुज की रचना दिखाई गई है। पांचवे चरण में तीन नए स्लाईडर दिखाई देते हैं जो भुआओं की लंबाई को 1 इकाई से 8 इकाई तब बदल सकते हैं। इनके उपयोग से अलग-अलग लंबाई की भुजाओं के त्रिभुज की रचना देखी जा सकती है। साथ ही इनकी मदद से त्रिभुज के बनने की शर्त (जो उपर लिखी गयी है) को भी घटते हुए देखा जा सकता है। उदाहरण के लिए QR=6 इकाई के लिए PR और PQ के 3 तक के मानों के लिए शर्त की पुष्टि कर सकते हैं।

Construction of a triangle whose length of three sides are given
We need to construct a triangle whose length of three sides are given. We will be using ruler and compass for this construction. We know that construction of a triangle is possible only when the sum of lengths of any two sides is more than the third side. We are asked to construct △PQR with PQ = 4 cm , QR = 5 cm and PR = 6 cm. We can see that the given lengths follow the condition of triangle construction. The construction can be done in the following steps :

Step 1 – Draw a rough sketch with the given lengths of sides.

Step 2 – Draw a line segment QR of 5 cm length.

Step 3 – The distance of point P from point Q is 4 cm. Taking Q as a center and radius equal to 4 cm draw an arc on one side of line segment QR. The point P is located on this arc only. We need to find its exact location.

Step 4 - The distance of point P from point R is 6 cm. Taking R as a center and radius equal to 6 cm draw an arc on the same side of QR as in step 3. The point P is also located on this arc.

Step 5 – From step 3 and step 4, it is clear that point P is located at the intersection of arcs of step 3 and step 4. Mark point P and join PQ and PR. The △PQR so obtained is the required triangle.

In the applet shown below, the construction of the triangle of the length of the given sides is shown in five steps. In the fifth step, three sliders representing side lengths from 1 unit to 8 units are shown at the bottom. These can be used to see the construction of triangles of different sides. At the same time, these can also be used to confirm the condition of the formation of a triangle. For example, for QR = 6 units, the values of PR and PQ up to 3 units can be tested to confirm the condition.

Saturday, September 28, 2019

Construction of a line parallel to a given line

एक दी हुई रेखा के समांतर रेखा खींचना
हमें एक रेखा l और एक बिन्दु N जो दी गयी रेखा के बाहर स्थित है , दिया गया है। बिन्दु N से होते हुए रूलर और परकार की मदद से रेखा l के समांतर एक रेखा m की रचना करनी है। रचना के चरण इस प्रकार हैं :

चरण 1 - दी गयी रेखा l खींचिए और रेखा के बाहर एक बिन्दु N लीजिए।

चरण 2 – रेखा l पर एक बिन्दु A अंकित कीजिए और बिन्दु A से बिन्दु N को मिलाइए।

चरण 3 – बिन्दु A को केन्द्र मानकर और एक सुविधाजनक त्रिज्या लेकर एक चाप बनाइए। यह चाप रेखा l को B पर और AN को C पर काटता है।

चरण 4 – बिन्दु N को केन्द्र और चरण 3 की त्रिज्या लेकर एक चाप बनाइए जो NA को बिन्दु D पर काटता है।

चरण 5 – परकार को BC लंबाई के बराबर खोलिए।

चरण 6 – D को केन्द्र मानकर परकार का खुलाव चरण 5 के बराबर रखते हुए एक चाप खींचिए जो चरण 4 के चाप को बिन्दु E पर काटता है।

चरण 7 – EN को मिलाकर रेखा m खींचिए जो दी गयी रेखा l के समांतर है।

नीचे एपलेट में उपर दिए चरण दिखाए गए हैं। एपलेट में ∠BAN = ∠ENA है , जो अंत: एकांतर कोण हैं , अत: रेखा m || रेखा l है। बिन्दु K को माउस की मदद से खींचकर रेखा l की अलग अलग परिस्थितियों में समांतर रेखा की रचना देखी जा सकती है।

Construction of a line parallel to a given line
We are given a line l and a point N not on the given line. We need to construct a line m with the help of ruler and compass through N parallel to the given line l. Following are the steps of construction:

Step 1 – Draw a line l and take a point N, not on the given line.

Step 2 – Take a point A on the given line l and join A with N.

Step 3 – Taking A as a center and a suitable radius draw an arc. This arc cuts the line l at B and AN at C.

Step 4 – Taking N as a center and with the radius of step 3, draw an arc which cuts NA at point D.

Step 5 – Open the compass equal in length to BC.

Step 6 – Taking D as a center and opening of the compass as in step 5 draw an arc which intersects the arc of step 4 at point E.

Step 7 – Join points E and N to make line m which is parallel to the line l.

The steps of constructions can be seen in the applet below. We can see that ∠BAN = ∠ENA, these are internal alternate angles. So line m || line l. Drag point K to see the construction of the parallel line in different positions of given line l.